Monday 9 March 2015

My Triple Frame with Blossom Bunch....

Morning all,
 
Blogged two days in a row..... woo hoo!!
 
I hope that you are all well.....
 
I had another great day at my crafting buddy Karen Clare's workshop again yesterday and this is the triple frame that I made, we all did very different takes on the frame and it was great to see how everyone interpreted what they wanted to do. I love these play days.......
 
I made mine using 3D gloss gel, Brusho's, black gesso, Inca Gold's, Spectrum Aqua's, Stampendous Stamps and Imagination Crafts Detail Sparkle.
Take a look......
 
 
A little closer look at the detail.....
 
 
And some more.....
 
 
And even a little more......
 
 
Karen's workshops are really great and if you get chance to attend one it is well worth it. Here is a little link to her FaceBook page  HERE
 
Well that is all for now peeps, I am off to Harrogate Show this week and then the NEC next week, so may go quiet for a while but will be back soon......
 
Big hugs Lisa B xx


Sunday 8 March 2015

Clock Canvas with my Lisa B Poppy Stamp with Imagination Crafts.......

Good evening all,
 
I am so sorry that I have just not had the time to blog on here lately but February and March are always really very busy months with lots of shows, makes and demos to prep for.......
 
Anyway I finally managed to finish and was happy with the clock canvas that I made last month at my great friend Karen Clares workshop.
Karen is always very laid back and lets us pretty much use and interpret our own designs on out makes and I always love attending her classes, that are such a great busman's holiday for me and so relaxing to go to.
 
They are also only about 25mins away from me here in Maidstone and are held in Swanley......


I used my brand new Poppy Stamp hand drawn and designed by myself with Imagination Crafts. Here is a closer look at the details......
 

It was made with Brushos, Imagination Stencil Paint, 3d Paste, Diamond Sparkle Medium and various stamps......


A closer look at the poppy......


I love this new word stamp from Stampendous.......


I will be back tomorrow with another make that I made today at Karens workshop a Candy Box Triple Frame........
 
Until then,
Big hugs
 
Lisa B xxx


Sunday 22 February 2015

Create and Craft Samples from the last Imagination Crafts Show part two.....

Good morning all,
 
Two days in a row hurrah!!
 
 
So today I am showing you the other samples that I made and demonstrated on the last Imagination Crafts Create and Craft Show.
 
So this time, here are some photos of the Starburst Garden Stamp  and the other background stencils  samples from the last show.....
 
Again I really wanted to keep the samples CAS to show how effective the products can be.....
 
I used the Stencil paints again that we had on the show as the colouring medium and as I said yesterday, I love it and will be stocking it soon.....
 
This colour I used on this sample was Lemon and Meadow Green, I love the way the colours blend and you get such bright colours from the pots ( this was a demo on the last program, if you missed it)......

 
For this next sample I used Bluebell and Lemon, for the background I used the Trellis with the Bluebell Stencil Paint and Diamond White Sparkle Medium. I also added some Lemon Sparkle Medium ( new colour ) to the centre of the flowers...... 
 

 I really enjoy working with all kinds of altered art and different wood and canvas etc. and found this balsa wood box in my stash so decided to decorate it using the Starburst Garden Stamp and Bluebell and Chalk Stencil Paints....
 
 
I stamped the flowers on to velum and embossed them with white embossing powder and then added Diamond White Sparkle Medium on top.......
 
The inside.....
 
 
A little closer look......
 
 
Well that has come to the end of my samples from the last show but I am working on lots more samples at the moment for all sorts of things, so I will be back soon to share them with you......
 
Until then big hugs.....
 
Lisa B xx


Saturday 21 February 2015

Create and Craft Samples from the last Imagination Crafts Show part one.....

 
Good morning all,
 
Apologies for being such a bad blogger but as I explained this blog is all about what I love to create in my spare time!!!
 
Unfortunately that has been non existent over the last month or so!!!
 
So I thought that I would show you some of the samples that I made and demonstrated on the last Imagination Crafts Create and Craft Show. I have been so busy trying to sort out new classes for 2015, creating samples and demos for C&C for Imagination Crafts, doing the work for, demonstrating and attending the NEC Trade Show and then there's the designing of products for Imagination Crafts which is time consuming but very exciting. There are nine new stamps being launched that I have designed and drawn by hand and there are also a range of stencils in the making and as soon as I can I will let you know when and where they will be available.......
 
So back to the samples, here are some photos of the Butterfly Garden Stamp Set and Honeycomb Background Stencil samples from the last show.....
 
I really wanted to keep the samples CAS to show how effective the products can be.....
 
I used the Stencil paints that we had on the show as the colouring medium and I have to say that I love it and will be stocking it soon.....
 
This colour is Mallow and I have stippled a little Diamond Sparkle Medium on the butterfly ( this was a demo on the last program, if you missed it)......

 
This time I used Mallow with Bluebell and it creates the most amazing lilac colour.
Twin butterflies on this one.....
 
 
Now this one is Mallow again but mixed with Chocolate it creates the most beautiful peachy colour, they really are amazing paints to work with.......
 
 
And finally I wanted to show how you can use the stencil paints on wood and canvas too with no prep, just straight on the surface.....
 
I love these mini canvases, they are so cute. This was Mallow again mixed with Bluebell.....
 
 
I hope you like what you see and I will be back tomorrow with some more samples from the show but this time using the Starburst Garden Stamp and Stencil Paints......
 
Until then big hugs.....
 
Lisa B xx


Saturday 31 January 2015

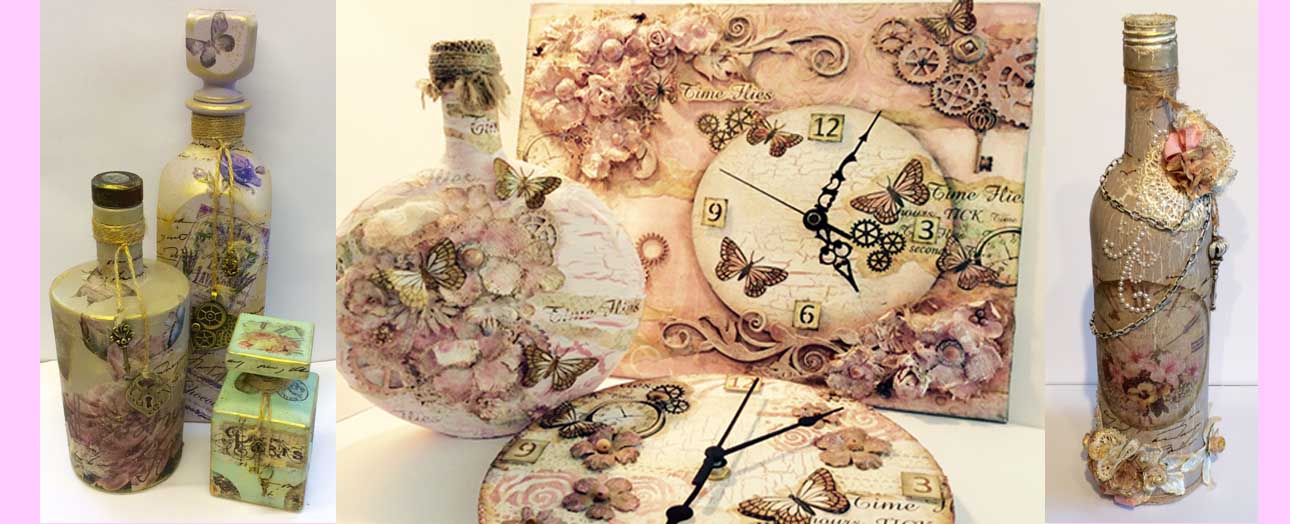
Time Flies.......


Good morning all,
 
 
Where has the time flown this last two weeks, I have been so busy getting ready for workshops, Create and Craft shows and designing new products that I have not had time to even show you what I have been playing with.......
 
So I thought that I would show you some of the samples that I made for our last Imagination Crafts program last Saturday.....
I designed a couple of stamp sets 'Time Flies' and 'Time Flies Accessories and I really got stuck in playing around with the stuff that I love..... 'Altered Art'......so let's take a peek......
 
This is just three of the samples that I made and loved every minute of it.......
 
 
The clock canvas, we featured the mdf clocks during the show......
 
 
Close ups.....
 
 
A lovely bit of Imagination Crafts crackle medium going on I the background.....


My altered bottle.....my first one and boy there will be many more......


And then the mdf clock......
 
 
Close up.....
 
 
I hope that you like my altered inspiration today, have a great weekend and I will be back soon....
 
Big hugs Lisa B xxx


Tuesday 27 January 2015

Technique Tuesday - Reversed, Resisted Glazed Tile......

Follow my blog with Bloglovin
Good Morning All,
 
How are we all today out in the crafty world?
Three weeks on the trot ehh but will it last....I hope so....
 
I thought I would show you a little technique that I discovered a little while back whilst playing around with three of my favourite things....stencils. inks and embossing powders.....
 
   I like to use to reverse a negative stencil image and then make it look like a glazed tile.
I have used one of my favourite IndigoBlu stamps the honeycomb background and an IndigoBlu stencil called daisy border to create the tile......
 
Here’s how it was done……..
 
I first cut myself a 5″ square of super smooth card stock. I inked up the honeycomb stamp with some Antique Linen distress ink and stamped across the centre of the card…..
 
Tutorial 1


tutorial2

Then using a blending tool I added Antique Linen Distress ink around the edges of the card…..I then laid the stencil over the piece of card, lining it up with the bottom and taped it to my mat. Then take a clear emboss pad or versamark ink and cake the ink direct from the pad over the exposed card areas, making sure that you cover all the areas…..
 
tutorial3

Next take some clear embossing powder, I used Wow superfine clear powder (my favourite) ,
remove the stencil and then add the powder generously and knock off the excess as shown below…..
 
Tutorial4

Heat the powder to create a shiny resist on the background, you can just about see it below…..

tutorial6

I then took a Bundled Sage Distress Ink and inked in the exposed areas of the background to highlight the stencil shape and form……
 
tutorial7

It is a good idea at this point to lay the stencil in front of you to get an idea of the design on the stencil properly before adding more detail……
 
tutorial8
 
I then started adding more colour with Distress Inks, starting with Mustard Seed using a small piece of cut'n'dry foam to apply it through the resisted background taking care to wipe off any excess ink with kitchen roll…..
 
tutorial9

I then added some Dried Marigold and finally Tumbled Glass to the butterfly and base….
.
tutorial10

Play around with the inks until you get your desired effect…..
 
tutorial11

Then to capture the colour and seal it in to the tile, again cake the whole piece of card with the clear emboss pad or Versamark and add  clear embossing powder on top as below….
 
tutorial12

Heat set with your heat gun and then repeat the process again until you get a beautiful liquid shine!
 
tutorial14

A little closer look at the shine on it…….
 
tutorial15

I then matted and layered it on to orange and cream card……
 
tutorial13

And there we have it, let me know what you think and why not have a go yourself, it is a great technique with lovely results!
 
Well that is all for now from me, have a great day….
Big hugs
 Lisa B xxx

Tuesday 20 January 2015

Technique Tuesday - Ying and Yang.....

Follow my blog with Bloglovin
Good Morning all,
 
Two weeks on the trot and technique Tuesday accomplished wahoo!!!
 
Well it is a little bit of a long one today but worth the while as I love the cleanness with the vibrancy of this technique and it is one of my favourites....
 
I call this technique 'Ying and Yan'
 
So first of all I cut a piece of white card 5″ square and then cut some copy paper to divide the card in two halves, I chose to do a curved shape but you can cut any shape you like…..

IMG_00001686 copy
 
 
I then placed the Diamond Stencil over the top of the card and stuck it down around the edge with stencil tape. I took two Distress Inks, I chose Spiced Marmalade and Mustard Seed and worked the colours over the stencil using a blending tool, you need to be quite random and add plenty of colour….

IMG_00001687 copycopy

When I removed the tape and stencil you can see the effect you get from the wavy line of the copy paper…..

IMG_00001689 copy
 
Next I replaced the copy paper and again taped it down with the stencil tape and then took a small amount of black gesso paint on to my craft mat and spritzed it with a little water….I then loaded up my brush and flicked it over the stencilled area, try to get some big blots and small blots to make it more interesting…..

IMG_00001691 copy

This is the result when the copy paper is removed, leave it aside to dry naturally….

IMG_00001693 copy

Next I took the small and medium Poinsettia Stamp ( now although this is called Poinsettia Stamp it is not just for Christmas but I use it all year round, loooove this stamp! ) I stamped three of each in Black Versafine Ink and then heat embossed them with Wow Clear Embossing Powder…..

IMG_00001699 copy
 
Next I took my two Distress Inks and some small pieces of Cut'n'Dry Foam
and blended the two colours over the top of the flowers starting with the yellow in the middle and then blending in to the orange on the outer edges…..
 
IMG_00001703 copy

Here is a closer look…..
 
IMG_00001704 copy
 
Repeat the process until all flowers are coloured. they don't look too clever at this point but just wait…….
 
IMG_00001707 copy
 
I then cut them all out leaving a small border around the edges, like so……..

IMG_00001709 copy
 
Pinch them between your finger and thumb to get more dimension in them……

IMG_00001716 copy

Like so…….

IMG_00001718 copy
 
Then back to your background……
I stamped my message from the Live, Laugh, Love IndigoBlu stamp set (another one of my favourites ) in the black ink and embossed it too…….

IMG_00001720 copy

Then I matted and layered it on to black and yellow card and then on to a 7″ square card……

IMG_00001722 copy

Lastly I added the flowers to the middle of the card following the curve that I had created……and voila you are done!

IMG_00001725 copy


Here are a few more examples in other colours and angle using different stamps and stencils.......

IMG_00001728 copy


Well I hope that you have enjoyed my Yin and Yang tutorial and fancy having a go......
 
See you soon…..
 
Hugs
Lisa B xxx