Saturday 31 January 2015

Time Flies.......


Good morning all,
 
 
Where has the time flown this last two weeks, I have been so busy getting ready for workshops, Create and Craft shows and designing new products that I have not had time to even show you what I have been playing with.......
 
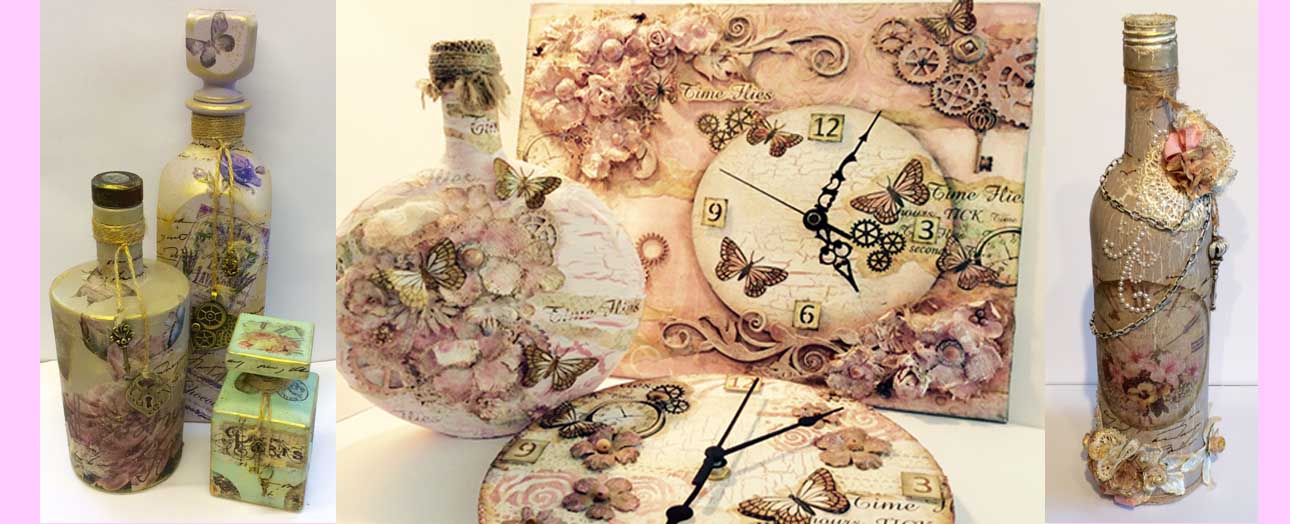
So I thought that I would show you some of the samples that I made for our last Imagination Crafts program last Saturday.....
I designed a couple of stamp sets 'Time Flies' and 'Time Flies Accessories and I really got stuck in playing around with the stuff that I love..... 'Altered Art'......so let's take a peek......
 
This is just three of the samples that I made and loved every minute of it.......
 
 
The clock canvas, we featured the mdf clocks during the show......
 
 
Close ups.....
 
 
A lovely bit of Imagination Crafts crackle medium going on I the background.....


My altered bottle.....my first one and boy there will be many more......


And then the mdf clock......
 
 
Close up.....
 
 
I hope that you like my altered inspiration today, have a great weekend and I will be back soon....
 
Big hugs Lisa B xxx


Tuesday 27 January 2015

Technique Tuesday - Reversed, Resisted Glazed Tile......

Follow my blog with Bloglovin
Good Morning All,
 
How are we all today out in the crafty world?
Three weeks on the trot ehh but will it last....I hope so....
 
I thought I would show you a little technique that I discovered a little while back whilst playing around with three of my favourite things....stencils. inks and embossing powders.....
 
   I like to use to reverse a negative stencil image and then make it look like a glazed tile.
I have used one of my favourite IndigoBlu stamps the honeycomb background and an IndigoBlu stencil called daisy border to create the tile......
 
Here’s how it was done……..
 
I first cut myself a 5″ square of super smooth card stock. I inked up the honeycomb stamp with some Antique Linen distress ink and stamped across the centre of the card…..
 
Tutorial 1


tutorial2

Then using a blending tool I added Antique Linen Distress ink around the edges of the card…..I then laid the stencil over the piece of card, lining it up with the bottom and taped it to my mat. Then take a clear emboss pad or versamark ink and cake the ink direct from the pad over the exposed card areas, making sure that you cover all the areas…..
 
tutorial3

Next take some clear embossing powder, I used Wow superfine clear powder (my favourite) ,
remove the stencil and then add the powder generously and knock off the excess as shown below…..
 
Tutorial4

Heat the powder to create a shiny resist on the background, you can just about see it below…..

tutorial6

I then took a Bundled Sage Distress Ink and inked in the exposed areas of the background to highlight the stencil shape and form……
 
tutorial7

It is a good idea at this point to lay the stencil in front of you to get an idea of the design on the stencil properly before adding more detail……
 
tutorial8
 
I then started adding more colour with Distress Inks, starting with Mustard Seed using a small piece of cut'n'dry foam to apply it through the resisted background taking care to wipe off any excess ink with kitchen roll…..
 
tutorial9

I then added some Dried Marigold and finally Tumbled Glass to the butterfly and base….
.
tutorial10

Play around with the inks until you get your desired effect…..
 
tutorial11

Then to capture the colour and seal it in to the tile, again cake the whole piece of card with the clear emboss pad or Versamark and add  clear embossing powder on top as below….
 
tutorial12

Heat set with your heat gun and then repeat the process again until you get a beautiful liquid shine!
 
tutorial14

A little closer look at the shine on it…….
 
tutorial15

I then matted and layered it on to orange and cream card……
 
tutorial13

And there we have it, let me know what you think and why not have a go yourself, it is a great technique with lovely results!
 
Well that is all for now from me, have a great day….
Big hugs
 Lisa B xxx

Tuesday 20 January 2015

Technique Tuesday - Ying and Yang.....

Follow my blog with Bloglovin
Good Morning all,
 
Two weeks on the trot and technique Tuesday accomplished wahoo!!!
 
Well it is a little bit of a long one today but worth the while as I love the cleanness with the vibrancy of this technique and it is one of my favourites....
 
I call this technique 'Ying and Yan'
 
So first of all I cut a piece of white card 5″ square and then cut some copy paper to divide the card in two halves, I chose to do a curved shape but you can cut any shape you like…..

IMG_00001686 copy
 
 
I then placed the Diamond Stencil over the top of the card and stuck it down around the edge with stencil tape. I took two Distress Inks, I chose Spiced Marmalade and Mustard Seed and worked the colours over the stencil using a blending tool, you need to be quite random and add plenty of colour….

IMG_00001687 copycopy

When I removed the tape and stencil you can see the effect you get from the wavy line of the copy paper…..

IMG_00001689 copy
 
Next I replaced the copy paper and again taped it down with the stencil tape and then took a small amount of black gesso paint on to my craft mat and spritzed it with a little water….I then loaded up my brush and flicked it over the stencilled area, try to get some big blots and small blots to make it more interesting…..

IMG_00001691 copy

This is the result when the copy paper is removed, leave it aside to dry naturally….

IMG_00001693 copy

Next I took the small and medium Poinsettia Stamp ( now although this is called Poinsettia Stamp it is not just for Christmas but I use it all year round, loooove this stamp! ) I stamped three of each in Black Versafine Ink and then heat embossed them with Wow Clear Embossing Powder…..

IMG_00001699 copy
 
Next I took my two Distress Inks and some small pieces of Cut'n'Dry Foam
and blended the two colours over the top of the flowers starting with the yellow in the middle and then blending in to the orange on the outer edges…..
 
IMG_00001703 copy

Here is a closer look…..
 
IMG_00001704 copy
 
Repeat the process until all flowers are coloured. they don't look too clever at this point but just wait…….
 
IMG_00001707 copy
 
I then cut them all out leaving a small border around the edges, like so……..

IMG_00001709 copy
 
Pinch them between your finger and thumb to get more dimension in them……

IMG_00001716 copy

Like so…….

IMG_00001718 copy
 
Then back to your background……
I stamped my message from the Live, Laugh, Love IndigoBlu stamp set (another one of my favourites ) in the black ink and embossed it too…….

IMG_00001720 copy

Then I matted and layered it on to black and yellow card and then on to a 7″ square card……

IMG_00001722 copy

Lastly I added the flowers to the middle of the card following the curve that I had created……and voila you are done!

IMG_00001725 copy


Here are a few more examples in other colours and angle using different stamps and stencils.......

IMG_00001728 copy


Well I hope that you have enjoyed my Yin and Yang tutorial and fancy having a go......
 
See you soon…..
 
Hugs
Lisa B xxx
Monday 19 January 2015

Brushos Box.......

 
Good morning all,
 
Well it certainly is a frosty one out there this morning brrrrr!!
I have my hot water bottle well and truly attached to me today in my studio along with the heater on full........
 
I must just tell you about my day yesterday......
 
I popped up to Swanley to attend a class with my lovely friend Karen Clare and took along a couple of my good friends Kirsten and Kate and what a great day we had creating a Candy Crafts Brushos Boxes.
As usual with Karen's workshops it was great fun and pretty laid back so there is no pressure and lots of time to play and create, the class was full and all the ladies made some fabulous boxes and all so different.......
 
 
This was Karen's lovely grungy take on the box but we were allowed to follow it or do our own thing and of course we all know that I am the biggest rebel of them all so just got stuck in.....
 
 
Karen's Box
 
 
I loved the concept and colours that Karen had used for the background but I am not heavily in to graffiti or grunge so opted to play with my Jofy Stamps and different resist products and loved every minute of it......
 
My Box


If you get the time to do one of Karen's workshops in Swanley, I really recommend it as they are always great value for money and you get great tuition and some fantastic ideas.
 
Karen has also started stocking items for sale as well which is handy if you want to elaborate and do more projects.....I know I do another Brushos box will be made soon!!
 
Well that is all from me for now but I will be back tomorrow with a little Tuesday tutorial....
 
Keep warm and safe, hugs.....
 
Lisa B xx


Friday 16 January 2015

Jofy Clock Canvas.......

Good morning all,

How are we all today? 

I thought that I would show you a make that I did a couple of months ago using jofy stamps.......
 
I really love Jo Firth-Young's stamps and love playing around with them when I get the chance.

This make was actually at one of my lovely friends, Karen Clare's clock workshops and we were meant to just be making clocks but me being me, I took along a canvas and everything but the kitchen sink!!!!
Karen, being Karen never minds if I just get on and do my own thing as I just don't get time to play enough......
So I ended up making this canvas which combined the clock within it and then did a page in my mini journal to remind myself of the make......
 
So let's take a look......
 
 
Here is a closer look at some of the details......
 
 
I used my Brushos and acrylic paints on the background......
 
 
The flowers were stamped on Teresa Collins paper pad and cut out......
 
 
This is the mini journal page that I did after......
 
 
I really love playing around with this kinda thing but just don't get enough time to play!!!
 
I hope you like the makes and I will be back soon with some more as soon as I get chance to play.......back to work now!!!!!! :0(

Big hugs

Lisa B xxx